Feeds:
Posts
Comments

Archive for July, 2010

If your anything like me when you’re at your favorite Chinese buffet your loading up your 3rd plate feeling great.  You justify all the food because everything has vegetables so it can’t be that bad for you. Well it can.  Between almost all the dishes containing some fried element or loaded with sugar and oil, MSG is also still present in many dishes.  MSG is a food additive that is added to foods to enhance flavors and there is still much controversy of its relative safety.  My viewpoint is that if you need to enhance your foods flavor unnaturally then you’re not making good food.

It is pretty easy to mix up an Asian style stir-fry with relatively few ingredients.  Tonight I made a chicken stir-fry in under an hour including prep time.  Here’s what you’ll need to make your own;

Ingredients:

  • 1 lb of chicken
  • 4 cups stir-fry vegetables (mushrooms, onions, bell peppers etc.)
  • rice

Sauce/ Marinade:

  • 1 tsp cumin
  • 1 tsp turmeric
  • 1 tbs scallions of green onion
  • 1/2 tsp salt & pepper
  • 1 tsp corn starch
  • 3 tbs rice wine vinegar
  • 1 tbs soy sauce
  • 2 tbs dark brown sugar

Directions:

First we’ll make the marinade.  Add cumin, turmeric, scallions, corn starch, salt, pepper and sugar to a bowl.  Mix in rice wine vinegar and then add soy sauce.  Cut chicken into about 1 inch pieces and place in marinade.  With the chicken cut the marinade only needs to marinate for about a half hour.

First prepare your favorite white or brown rice.  If you have a wok now is the time to use it.  Cooking this meal is relatively quick with a wok but a regular non-stick pan will work.    Heat about a tablespoon of peanut oil in the wok or pan on high heat.  Remove chicken from marinade while keeping the sauce for later use.  When the oil starts to smoke your ready to cook the chicken.  Place chicken in pan and stir-fry for a about 5 minutes or until chicken is slightly underdone and remove from wok/pan.  Add another tablespoon of oil to wok/pan and add vegetables.

Stir fry until you start to see browning.  Add marinade to the vegetables along with the chicken and cover for about 5 minutes stirring occasionally.  Remove from heat and serve on rice immediately.  You can spice this up by adding red pepper flake for some heat or chopped peanuts for additional flavor.  Let me know if you try this and if you change it up at all. Enjoy.

Read Full Post »

A few nights ago was the MLB All-Star Game and as every year, I invited a bunch of friends to come over and watch the game while enjoying some food.  This year we decided to make Brats and Sliders as well as some homemade Peanuts and Cracker Jacks, you know baseball food.  The Brats were the easiest to prepare and make while the sliders took slightly more work.  The Cracker Jacks was just my caramel popcorn recipe with added roasted peanuts.  Everything turned out great and I’d like to share how I made everything.  Tonight’s focus will be on the sliders.

First we’ll start with all the prep work.  The sliders were prepped the night before the party. Here’s what you’ll need;

Ingredients:

  • 1 lb of ground sirloin -(not ground beef, and you’ll want a ratio of at least 85/15 or your patties will lose too much weight you don’t eat a lot of ground beef so here is where you can splurge a bit.)
  • Salt
  • Pepper
  • Garlic and Onion Powder
  • Potato, Hawaiian or Dinner rolls
  • Fixings

Directions:

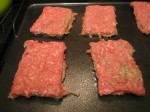
In a 9×13 cookie sheet place a layer of wax paper down. On the paper place the ground sirloin and roll out with a roller or glass cup until it fills the sheet and is about an 1/8 of an inch thick.  You should have a thin rectangular sheet of the ground sirloin.  This is where the seasoning will come in.  You can use anything here, I used salt, pepper, onion and garlic powder. Season evenly over the whole top side of the meat.  This step insures every bite of the sliders will be seasoned the same and satisfaction will ensue.  Now fold over lengthwise the sirloin so that the seasoned part of the meat is now in between the two layers.  Firmly press the layers together or a pocket will form for grease to collect and shoot on some unsuspecting patrons of your party (sorry Megan and Danny).  Cut into 8 equal size portions.  At this point I refrigerated until the next day, taking the meat out of the fridge an hour before cooking to reach room temperature.

Now on to cooking our sliders.  The griddle is the best, fastest and easiest piece of kitchen equipment that we can use to make a large quantity of sliders.  We can cook about 8 at a time so this is perfect for a party when you have to pump out a few dozen in a few minutes.

The griddle needs to get nice and hot from 375-400.  You’ll place all 8 on, one right after another.  Cook for two minutes on each side or until you see the bottoms start to sear.  You’ll flip each slider in the order you put them on then cook for another 2 minutes.  Place any cheese you have on right after the flip to help with the melting.  Bam your done.  Serve on your favorite roll of choice and your choice of toppings.  Call em mini burgers or sliders, in any case their delicious. Enjoy.

Read Full Post »

The last few weeks have been absolutely crazy.  The Gulf oil spill has completely changed the dynamic of my job recently.  This has resulted in much longer days in which I don’t feel like cooking a meal when I get home or experimenting with any new tastes or concoctions.  This has turned into focusing on comfort foods that make us feel better and take the mind off of the tragedy we have on our shore.   I always found it weird that every funeral I’ve attended was consequently followed by a feast.  It’s surprising the power of food helps at least for the moment to overcome some of that grief and is understandable that the mind turns to comfort foods to…well, comfort us.  In the next few posts I’ll be sharing some of our comfort foods that always make the day seem brighter until l of course were contemplating why we had thirds. 

For now I’d like to focus on making quick snacks.  Something we can pull out of the pantry and snack on instantaneously.  One of my favorites that are great on bread, celery, apples and bananas is peanut butter.   Peanut butter is a food that is full of “good” fats and oils and helps give you a full feeling after eating a relatively small amount while being delicious.  Unfortunately store bought brands, even the low fat, are loaded with sugars and hydrogenated vegetable oils.  If you make your own you can limit the ingredients to about 4. Peanuts, peanut oil, salt and honey (optional but worth it).

I used one of my favorite sources for this recipe, Alton Brown.  Here is the link to the original recipe. Original Recipe Link

The one variation I made was buying shelled and blanched peanuts.  There is little time for shelling my own and can’t yet say that it would be worth it unless buying farm fresh maybe.  So here is Alton’s Recipe;

Ingredients

  • 15 ounces shelled and skinned AB’s roasted peanuts, recipe follows
  • 1 teaspoon kosher salt
  • 1 1/2 teaspoons honey
  • 1 1/2 tablespoons peanut oil

Directions

Place the peanuts, salt and honey into the bowl of a food processor. Process for 1 minute. Scrape down the sides of the bowl. Place the lid back on and continue to process while slowly drizzling in the oil and process until the mixture is smooth, 1 1/2 to 2 minutes. Place the peanut butter in an airtight container and store in the refrigerator for up to 2 months.

Roasted Peanuts:

  • 2 pounds in-shell raw peanuts*
  • 2 tablespoons peanut oil
  • 1 to 2 tablespoons kosher salt

*Cooks note: If eating peanuts roasted right out of the shell, use Virginia or Valencia peanuts. If utilizing roasted peanuts to make peanut butter, use Spanish peanuts as they have a higher oil content.

Preheat the oven to 350 degrees F.

Rinse the peanuts under cool water to remove excess dirt. Pat dry and place in a large bowl and toss with the peanut oil and salt until well coated.

Place on 2 half sheet pans, making sure to spread them out into a single layer. Roast in the oven for 30 to 35 minutes, rotating the pans halfway through cooking. Once you remove the peanuts from the oven, let them cool slightly before eating. They will continue to “cook” and become crunchy as they cool.

If using peanuts to make peanut butter, remove shells and discard. Remove the skin by rubbing the peanuts together in your hands held over a salad spinner, allowing the peanuts and skins to fall into the bowl. Once the skin has been loosened from all of the peanuts close the salad spinner and spin until all of the skin has been separated from the peanuts.

That’s all there is to it. In about an hour you can make your own Peanut Butter without any of the preservatives, sugar and hydrogenated oils.  Now I just need a good recipe for some jelly or jam. 

Bonus:  For reading this entire post I’d like to share a recipe clone of my favorite candy of all times;

Homemade peanut butter cups

Read Full Post »