Feeds:
Posts
Comments

Archive for the ‘Meat’ Category

Is there anything on this planet that’s as good as shrimp? Shrimp is one of the easiest things on the earth to cook but unfortunately so many people are afraid to mess it up.  Shrimp can be fried, sauteed, grilled, blackened, boiled and made just about anyway you like it.  The only real way to ruin shrimp is to overcook it when it then becomes tough and rubbery.  This happens to be the case with many varieties of sea foods by the way.  One of the easiest fool proof shrimp recipe I have found was a shrimp boil.  Potatoes, corn, sausage and shrimp, a perfect combination.
The only special equipment you need for a boil is a large stock pot.  Depending on the servings you will be making the larger the better.  Some people use a frying or boiling basket for ease of removing all your edibles but it’s not necessary if you have a colander.
After inviting four of our friends over we gathered the necessary equipment to feed a small army.  The amount of food can be multiplied easily to feed as many as needed.
Ingredients:

  • 3 lbs 14-16 shrimp (royal reds are preferred)
  • 5 lbs small fancy or fingerling potatoes (unpeeled, whole)
  • 6 ears of corn (husked and halved)
  • 2-3 lbs sausage (andouille, brats or any preference)
  • 1 seasoning bag ( 4 bay leaves,1 tbsp. black peppercorns or coarse pepper,1 tbsp. salt,2 tsp. cayenne pepper, 1 tsp. celery seed, 1 tsp. whole cloves, 1 tsp. mustard seed, 1 tbsp. allspice,1 tsp. dry thyme leaves)
  • 1 Lemon quartered
  • Salt if desired

Directions;
Fill stockpot about a third of the way with water and bring to a boil.  When boiling add the seasoning bag, potatoes, corn and lemons.  Cover and let boil for 15 minutes then add the shrimp and sausage.  Continue to boil for 5 minutes then remove from the heat.  You will want to let the boil rest for about 20-30 minutes.  There is a lot of water so don’t be worried about cooling.  This resting period is crucial as the seasoning needs time to soak into the food.  Without letting the boil soak you will get bland shrimp.  That’s it, you are ready to serve.  Drain and put contents into a large bowl for everyone to share. This is a very hard recipe to mess up.  Boil, add food, boil, rest.  It’s really that easy.
I love making this for a large number of people because it is delicious and the ingredients really make the recipe.  You can get creative and look up many boil recipes online.  The next one I’d like to try is the Cajun boil.
A few tips, get quality ingredients.  I like to use fingerling potatoes as they have a good taste and you don’t have to chop or peel.  Another thing is to buy good shrimp.  I really like Royal Reds as they hold up to peeling better and they are a little sweeter and denser than regular gulf shrimp.  They are a colder water shrimp and many liken their taste to lobster although I find that a bit of a stretch but I do notice a difference.  I hope you all try this and let me know what you think.

Read Full Post »

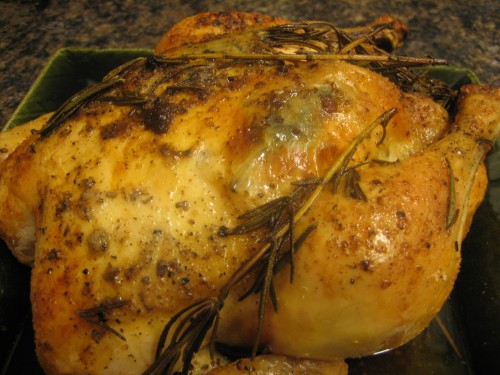
Sometimes you think, “There has to be a secret to that”. There are dishes that I wouldn’t say I’m afraid of making but have been stand offish to say the least. Case in point, I’ve never cooked a whole bird, chicken or turkey or any other fowl for that matter.  There are so many possibilities of things to go wrong.  The meat can be too dry, overcooked, undercooked, and bland and the list goes on and on.  So to jump head first I wanted to roast my own chicken.  Since the house consists of me and Stef, I settled on a whole chicken weighing in between 3-5 lbs as being ideal for a good meal and some leftovers.

After scouring the web for roasted chicken recipes I think I have conglomerated a recipe that will stand up to any grandmas cooked bird.  I know this is a bold statement but after you try this you will not be disappointed and you will no longer fear the whole bird.  The greatest thing about this recipe is its simplicity.  You almost cannot mess this up hence removing any reservations you may have had in the past.  So let’s get started. Here’s what you’ll need.

Ingredients:

  • 1 young chicken 3-5 lbs (giblets removed)
  • 1 tsp Kosher salt
  • 2 Tbsp Onion Powder
  • Garlic (sliced)
  • 1 stick of unsalted butter
  • 3-5 sprigs of fresh rosemary
  • 1 stalk of celery

Directions:

Pre-heat oven to 350 Degrees.  Remove giblets or bag from chicken and rinse the chicken thoroughly.   Place on a roasting pan with rack.  Add copious amounts of onion powder and some salt to the cavity.  Place one half of stick of butter (solid) in the cavity along with sliced celery and 3 sprigs of fresh rosemary.  Cut a few random holes in the skin and stuff with sliced garlic and a pat of butter just under the surface of the skin.  Combine onion powder and salt and rub on the entire surface of the chicken.  Using the remainder of the butter, cut pats and place on outside skin all around the chicken.  Place a sprig or two of rosemary on top of the chicken.

Place chicken in a roasting pan with a rack and cook for 1 1/2 hours or 20 minutes per pound of chicken.  Check with a meat thermometer that the internal temperature comes to 180 degrees.  After chicken has cooked place on a tray and baste with the juices left in the roasting pan.  Cover with aluminum foil for 30 minutes then serve.  If you like a crispier skin, baste on more time, place chicken back in oven for 10-15 minutes until the skin becomes crispy again.  This is guaranteed to be a juicy bird.  I have made this 3 times in the past month and couldn’t be happier to have demystified something I though took magic to master.  If there are any dishes you’ve come across that were so much easier than expected please share them.  Enjoy.

hmmmmm

Read Full Post »

A few nights ago was the MLB All-Star Game and as every year, I invited a bunch of friends to come over and watch the game while enjoying some food.  This year we decided to make Brats and Sliders as well as some homemade Peanuts and Cracker Jacks, you know baseball food.  The Brats were the easiest to prepare and make while the sliders took slightly more work.  The Cracker Jacks was just my caramel popcorn recipe with added roasted peanuts.  Everything turned out great and I’d like to share how I made everything.  Tonight’s focus will be on the sliders.

First we’ll start with all the prep work.  The sliders were prepped the night before the party. Here’s what you’ll need;

Ingredients:

  • 1 lb of ground sirloin -(not ground beef, and you’ll want a ratio of at least 85/15 or your patties will lose too much weight you don’t eat a lot of ground beef so here is where you can splurge a bit.)
  • Salt
  • Pepper
  • Garlic and Onion Powder
  • Potato, Hawaiian or Dinner rolls
  • Fixings

Directions:

In a 9×13 cookie sheet place a layer of wax paper down. On the paper place the ground sirloin and roll out with a roller or glass cup until it fills the sheet and is about an 1/8 of an inch thick.  You should have a thin rectangular sheet of the ground sirloin.  This is where the seasoning will come in.  You can use anything here, I used salt, pepper, onion and garlic powder. Season evenly over the whole top side of the meat.  This step insures every bite of the sliders will be seasoned the same and satisfaction will ensue.  Now fold over lengthwise the sirloin so that the seasoned part of the meat is now in between the two layers.  Firmly press the layers together or a pocket will form for grease to collect and shoot on some unsuspecting patrons of your party (sorry Megan and Danny).  Cut into 8 equal size portions.  At this point I refrigerated until the next day, taking the meat out of the fridge an hour before cooking to reach room temperature.

Now on to cooking our sliders.  The griddle is the best, fastest and easiest piece of kitchen equipment that we can use to make a large quantity of sliders.  We can cook about 8 at a time so this is perfect for a party when you have to pump out a few dozen in a few minutes.

The griddle needs to get nice and hot from 375-400.  You’ll place all 8 on, one right after another.  Cook for two minutes on each side or until you see the bottoms start to sear.  You’ll flip each slider in the order you put them on then cook for another 2 minutes.  Place any cheese you have on right after the flip to help with the melting.  Bam your done.  Serve on your favorite roll of choice and your choice of toppings.  Call em mini burgers or sliders, in any case their delicious. Enjoy.

Read Full Post »

You’re having company and you need a good meal that tastes great and you need it to be ready about the time you get home from work.  What do you do?  You pull out one of the best pieces of equipment in your kitchen…the crock pot or slow cooker.  I love my Crock-Pot. Everything I put in it turns to gold.

The Crock-Pot is a relative recent cooking invention (1971 to be precise) that lets you start a dish in the morning and finished by the time you get home.  This is a much better alternative than cooking the night before and heating up leftovers and tastes better also.  The Crock-Pot is great at cooking meats that will toughen when boiled by cooking for longer periods of time at lower temperatures.  This softens connective tissue without making the meat tough.  Now you will loose some nutrients from the vegetables by cooking them for so long so don’t expect the same nutrition out of them as steamed veggies. 

Last night I put together a Pot Roast and put it on this morning.  The preparation is easy so don’t shy away from this one.  Here’s what you’ll need;

  • Ingredients:
  • 1 clove garlic
  • 1 bay leaf
  • Salt and pepper
  • 1-2 tbs Extra virgin olive oil
  • 2 onions
  • ½ stalk celery
  • 1-2 cups vegetable or beef stock (I will post my veggie stock recipe soon)
  • 3-4 lb rump roast
  • 1 cup Red wine

Directions:
Cut garlic into slivers and place into cut slits on the roast.  Crush bay leaf and add to ½ tbs crushed black pepper and 1 tsp salt.  Rub the entire Roast with the seasoning.  (Optional) Heat some oil in a large pot or pan and brown roast on all sides.  Add roast to the crock pot.  Add all vegetables to the crock pot cover and place in fridge (unless cooking same day).  Day of cooking- add 2 cups veggie or beef stock and red wine to crock pot.  Turn on and cook on low for at least 8 hours. Done.

This recipe is an easy one and tastes just like your gramma made it, unless of course you are a grandma then in that case it’ll taste just like you made it.  I made a simple horseradish sauce to go with this which is takes five minutes but is worth it.  1 cup heavy whipping cream 1/4 cup horseradish (fresh) 1/4 cup bleu cheese and a tbs of dijon mustard.  Blended all ingredients well in the food processor (cream will thicken) and let it sit for a few hours to blend all the  tastes.  If you try this recipe let me know what you think.  Enjoy.

Read Full Post »

There is nothing in the world I would rather eat than steak. We usually only allow ourselves one red meat course a week and half the time I will opt for some kind of steak dinner. There is nothing that matches the flavors of high quality beef matched with fire. Some of the best and most disappointing meals that I have had, steak was involved. It is very easy to surpass the quality of restaurant chains at home with a good cut of meat and a few briquettes or hardwoods.

Today was the day that I had been waiting for all week. Fillet with Gorgonzola sauce. I had just gotten home when it started to rain. There goes the plans for grilling. What to do, skip to tomorrows meal plan or make do with what resources I had. I decided to cook the fillet the way most restaurants do…in the oven. As sacrilegious as this sounds you can make a great cut of beef taste good straight out of the oven with a little prep work of course. So let me show you what I mean.

Pick up the freshest cuts of fillet you can get. If you have a butcher that’s ideal, if you need to go to the grocery store the fine people in the meat departments usually cut there beef daily then package it at the end of the day so go for one behind the glass and not one that’s been sitting on the shelf for a few days.

You’ll want a light season of the fillet when it cooks. An easy one is 1tsp of mixed peppercorns and 1 tbs of mustard seed. Using a pestal and mortar grind up your spices. Add about a tsp of sea salt to the mustard and pepper and rub on the fillets. Let sit at room temperature for about 20 minutes while you prepare your Gorgonzola sauce. Preheat your oven to 400 F.

Ingredients:

  • 2 oz of Gorgonzola cheese
  • 3 oz cream cheese 1 tbs mayonnaise (recommended recipe)
  • ¼ cup green onions
  • 1 tbs sour cream
  • dash Worcestershire sauce
  • salt and pepper to taste

Directions:

Put Gorgonzola in food processor and pulse to until cheese is broken into dime sized chunks. Place the rest of the ingredients and process until smooth. Keep in a small serving dish at room temperature.

Now for cooking the fillet. Heat a cast iron pan as hot as you can get it. Add a tbs of butter in the pan and immediately place in both fillets for one minute and flip continuing to cook for one minute. Both sides should be seared. Remove fillet from cast iron and place on a cookie sheet. Place in oven and cook for 25 -35 minutes (medium rare at 25 to medium well at 35 minutes). Remove steak and place a foil tent over them for 10-15 minutes. This will let the juices redistribute and will continue to cook while setting. Serve with sauce and enjoy. The Gorgonzola sauce is also great with asparagus or broccoli.

I do still prefer the grill as the taste of a fire grilled steak is second to none but in the case of a rainy afternoon and no chance to go outside this will still be a close second in terms of taste. Don’t go crazy with the sauce as it can easily overpower your tender fillet if you add too much. I hope you all enjoy this as it is as easy to make as it is delicious. Enjoy.

On another note I’ve been taking my pictures with my iPhone.  Sorry about how washed out some of  them look.  I’m looking into other options in the mean time.

Read Full Post »

One of my favorite things to cook now that I got my new grill for Christmas is Pulled Pork.  There is nothing like meat that has been smoking over low heat all day.  I will attempt to share my recipe with you and things I’ve learned along the way.  Here’s what you’ll need;

A smoker– I use a charcoal grill with a smoke box attachment.  Different smokers will cook differently so use the directions your smoker comes with. 

A Picnic cut of pork- this is the lower shoulder traditionally used in smoking pulled pork.  Lower valued cuts like the Boston butts are also used but don’t have the same flavor you’ll get out of a shoulder due to the higher fat content (you need a good amount of fat to break down and make your pork juicy and tender). 

The Dry Rub– The quintessential ingredient that give BBQ its bite.

The Mop- a basting liquid used while you’re cooking/ smoking your pork

The Smoke– Different woods different flavors.

The Prep work (the night before smoking):  You’ll want to trim some of the skin off of the shoulder, not any of the fat, just the skin.  You’ll want to remove the first 1/8 inch off the parts of the Picnic that won’t have direct contact with the grill.  Next you’ll want to rub your picnic very liberally, you’re gonna get dirty, they call it a rub for a reason.  After your picnic is covered in spice you’ll want to wrap it in cling wrap and let it sit overnight in the fridge.

My rub recipe:

  • 8 tablespoons paprika
  • 6 tablespoons garlic powder
  • 6 tablespoons salt
  • 5 tablespoons black pepper
  • 3 tablespoons cayenne
  • 3 tablespoons onion powder
  • 2 tablespoons dried oregano
  • 2 tablespoons dried thyme

 The Smoke– Traditionally the fire is made of the coals from the hardwood you’ll be using to smoke your pork but to save a few hours time we can use charcoal briquettes as long as they have no fuel additives, which can impart a horrible flavor to your pork.  I use a chimney starter to light my charcoal and get up to a high temperature in a relatively short amount of time (15min).  I add the coal to my smoker box and start adding a few smoking logs.  You want to get a steady temperature between 210-230F.  When your temperature stabilizes you’re ready to add your pork. 

What kind of wood should I smoke with?  I’ll let you check out this article  and let you know my favorite so far is mesquite.  If you are using logs there is no need to soak them before putting them on the fire, if using small chunks or chips you’ll want to soak them for a few hours before using them. 

Smoking the Picnic:  This is the part where you’ll need to spend a lot of time tending to your craft.  When we get a nice stable temperature, 210-230F, we can place the Picnic fat side down.  Cover and tend to the smoker.  You will smoke the Picnic for 1-1 ½ hours per pound.  If your smoker gets to hot you can open the cover to let some heat out.  You can use a BBQ mop to baste the Picnic every 2 hours or so. This will help retain moisture and add a nice flavor in addition to your rub. 

Mop Recipe:

  • 1/2 cup apple cider vinegar
  • 1/4 cup olive oil
  • 1/4 cup beer
  • 3 tablespoons paprika
  • 1 teaspoon salt
  • 1 teaspoon black pepper

Combine all ingredients.  Brush over Pork every 2 hours.

Some people will smoke for the whole cooking process while others prefer to only smoke for half of the time and wrap there picnic in aluminum foil and return to smoker or oven to cook the rest of the way.  Meat can become bitter if over-smoked according to some but I have yet to hit this threshold.   

When your meat reaches an internal temperature of 180-190F it is ready to be pulled.  You should wrap the meat in aluminum foil and let rest for about an hour.  This will help redistribute the internal juices and make for juicier pork.  Remove from foil after an hour and start pulling apart large pieces with 2 forks.  Add your favorite cole-slaw and BBQ sauce and you’re done.  Enjoy. 

Read Full Post »

We made homemade steak burritos tonight.  We had marinated skirt steak, perfect for fajitas or burritos.  I used an Alton Brown recipe  to marinade the skirt steak for 4 hours.  I did however use a cast iron skillet set on high heat to cook the steak.  I seared the outsides of the steak and continued cooking for 2 min each side due to the thinness of the cut.  The steak is then placed between two layers of aluminum foil and let set for 15 minutes.  I then cook down sliced onions, green and red bell peppers in the rest of the marinade and add about a 1/4 cup of tequila to the mixture.  Cut steak into small strips and its ready to put into flour tortilla.  Add the peppers and desired toppings.  We used steak, peppers, cheese and topped with a homemade tomatillo salsa (recipe below).

Skirt steak marinade recipe


Tomatillo salsa recipe

Ingredients:

28 oz can tomatillos

3 jalapeno peppers (fresh not pickled)

1/2 – 1 cup fresh cilantro

1/2 small white onion (may substitute green onion *preferred)

tsp white vinegar

tsp lime zest

juice of 1/2 lime

Directions:

Food process onion peppers and cilantro.  Add the rest of ingredients to food processor until desired texture is achieved.   Done.

Read Full Post »